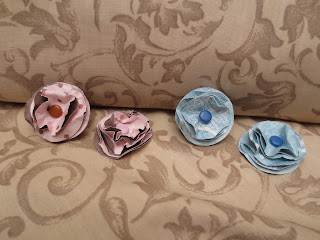
EASY PAPER FLOWERS
Today's post is to show you how to make some simple, layered paper flowers.
It is my Design Team example for August's Unstampabelles challenge, which is:
August - Anything but a Card TWIST Create a tutorial in your blog OR add a link to the one you used to create the item
You'll need:
- A circle punch with two sizes. I've used the Creative Memories 1 1/4 and 1 1/2 circle shapemaker.
- Doubled sided paper.
- Brads
- Something to make a hole with. I used a blade.
The first step is to punch 8 of the larger shape and 4 of the smaller shape.
Put a small hole in the centre of each one. Scrunch them all up.
Then it is a simple matter of pushing a brad through the smallest ones, followed by the largest ones. I alternated the papers so each second one was the reverse side of the patterned paper. Then you can shape each flower until you are satisfied with the result.
You will get two flowers from each set. I have made some pink and brown ones and some blues ones. The blue ones are actually from a snowflake paper. I don't have much call to use snowflake paper so it is a good use of this paper in my stash.
Please take a look at the other Designer's work over at Unstampabelles. There are some really inspiring projects. Each week in August you will see something new and there is a wide variety of items to see this month.
You could win this die.

Don't forget - no stamping.
Thanks for looking. xx


Looks cool, Dale!!
ReplyDelete